
Cisco Switch Virtualization (Clustering)
Network Virtualization vs Device Virtualization:
Examples of Network Virtualization
- Virtual Port-channel (vPC)
- VLAN (L2)
- VRF (L3)
- VSAN
Examples of Device Virtualization
- Security Context
- Virtual Device Context (VDC)
- Virtual Switch System (VSS)
- StackWise Virtual (SV) and Physical StackWise
- Virtual Machines (VMs)
Why Use Switch/Device Virtualization?
- Eliminate STP blocked paths, FHRPs, and multiple device administration touch points
- Simplifies operations of campus access, distribution, and core topology
- Active/Active data plane path via Multi-chassis Etherchannel (MEC) = more bandwidth and lower latency
- Improve convergence times
Cisco Switch Virtualization Offerings:
- Traditional physical StackWise and StackWise Plus
- Virtual Switching System (VSS)
- StackWise Virtual (think VSS version 2)
- Virtual Port-channel (vPC): Data center focus, NOT campus, more network virtualization vs device virtualization as it requires FHRP
StackWise Virtual Deep Dive:
StackWise Virtual (SV) is Cisco’s latest offering for campus switch virtualization (sometimes called switch clustering) and what I’ll spend the bulk of this post discussing. SV has a VERY special place in my nerd heart. That’s because I got to name this awesome solution! Not only did I get to come up with the name, they BU even paid me for my creativity. #WinWin
“Shaun, Thanks for your input on our Next Generation Stacking for Catalyst 3850. We will proceed with StackWise Virtual.”
Sadly, I don’t always get my grubby mitts on the actual configuration as fast as I’d like to. In this example, I came up with the name back in June of 2016 and only got to implement SV on the new Catalyst 9500 (high-performance) this month. Until this point, I’ve done plenty of VSS and vPC, but not SV.
What I’ve discovered is that with each iteration, the actual process of clustering the switches becomes easier and less painful.
Before I go into the actual configuration of SV, allow me to elaborate on the solution and architecture.
Let’s start with this simple image (inline) regarding the evolution on campus topologies. To simplify this point, let’s imagine it’s a two-tier collapsed core design with access layer (IDF) at the bottom and distribution/core (MDF) at the top.
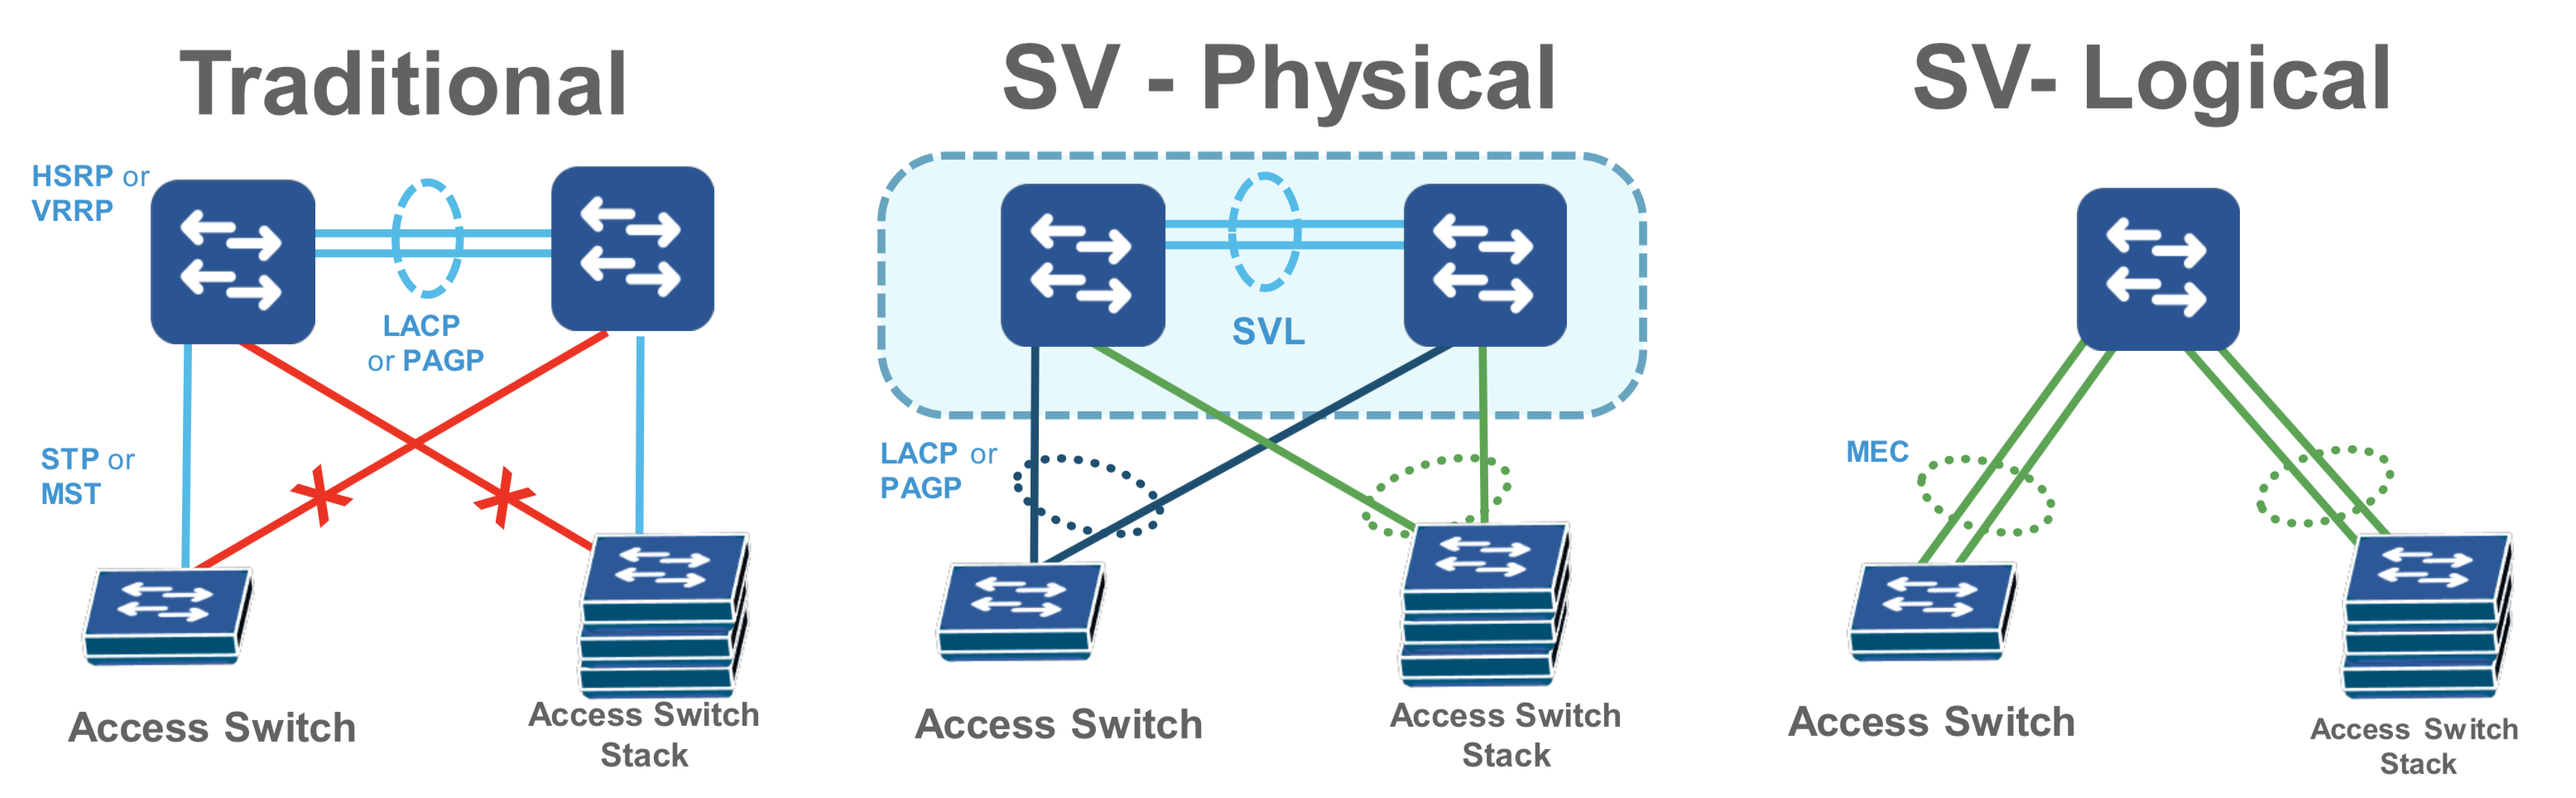
Sure you can still use the traditional approach of leveraging STP and FHRPs, but this is still complex and rigid in terms of design and operations.
Do I split my STP root for certain VLANs to leverage the available uplink bandwidth, make sure my FHRP forwarder is deterministic, etc…???
Why not just take the two collapsed cores and make them into a logical single unit and while I’m at it, leverage physical StackWise at the access layer.
Now, I only have two logical devices to manage when in fact it could be as many as 10 total switches (8x IDF, 2x MDF) consolidated down to two operational touch-points.
In addition, I’ve also removed the complexity of FHRP tuning, STP loop prevention, PIM tuning from the design and gained the ability to leverage all my port-channel member link throughput by leveraging MEC.

Now, let’s break down the StackWise Virtual architecture.
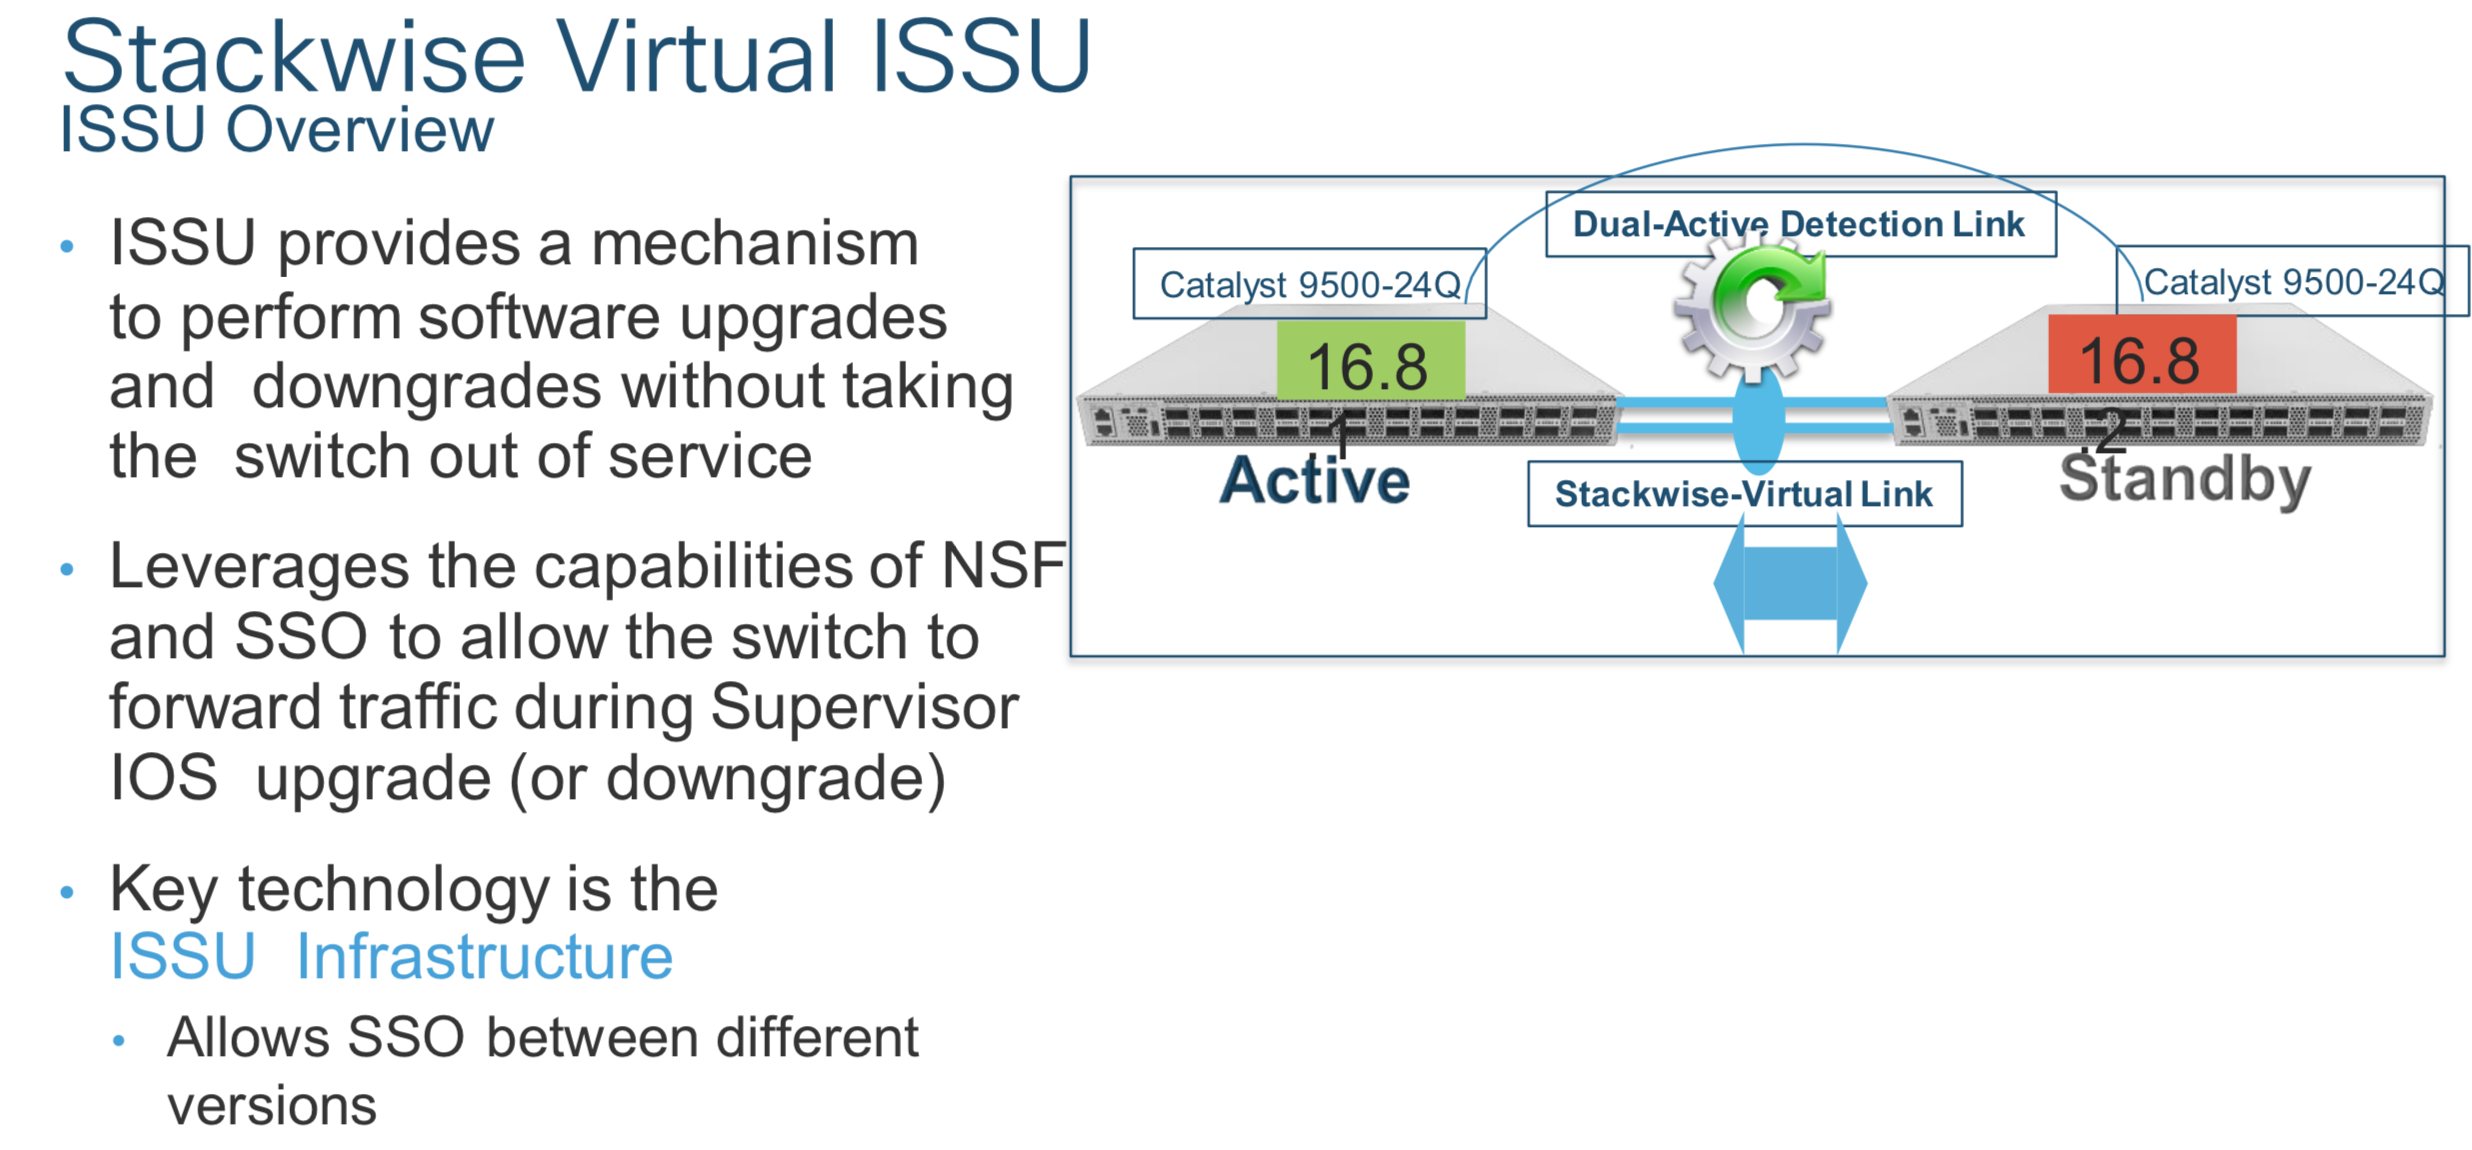
- Control Plane: Unified CP, StackWise Virtual Link (SVL) to join the two switches together.
- Data Plane: Active/Active DP, both switches are capable of forwarding the traffic locally
- SV Components:

- SSO:
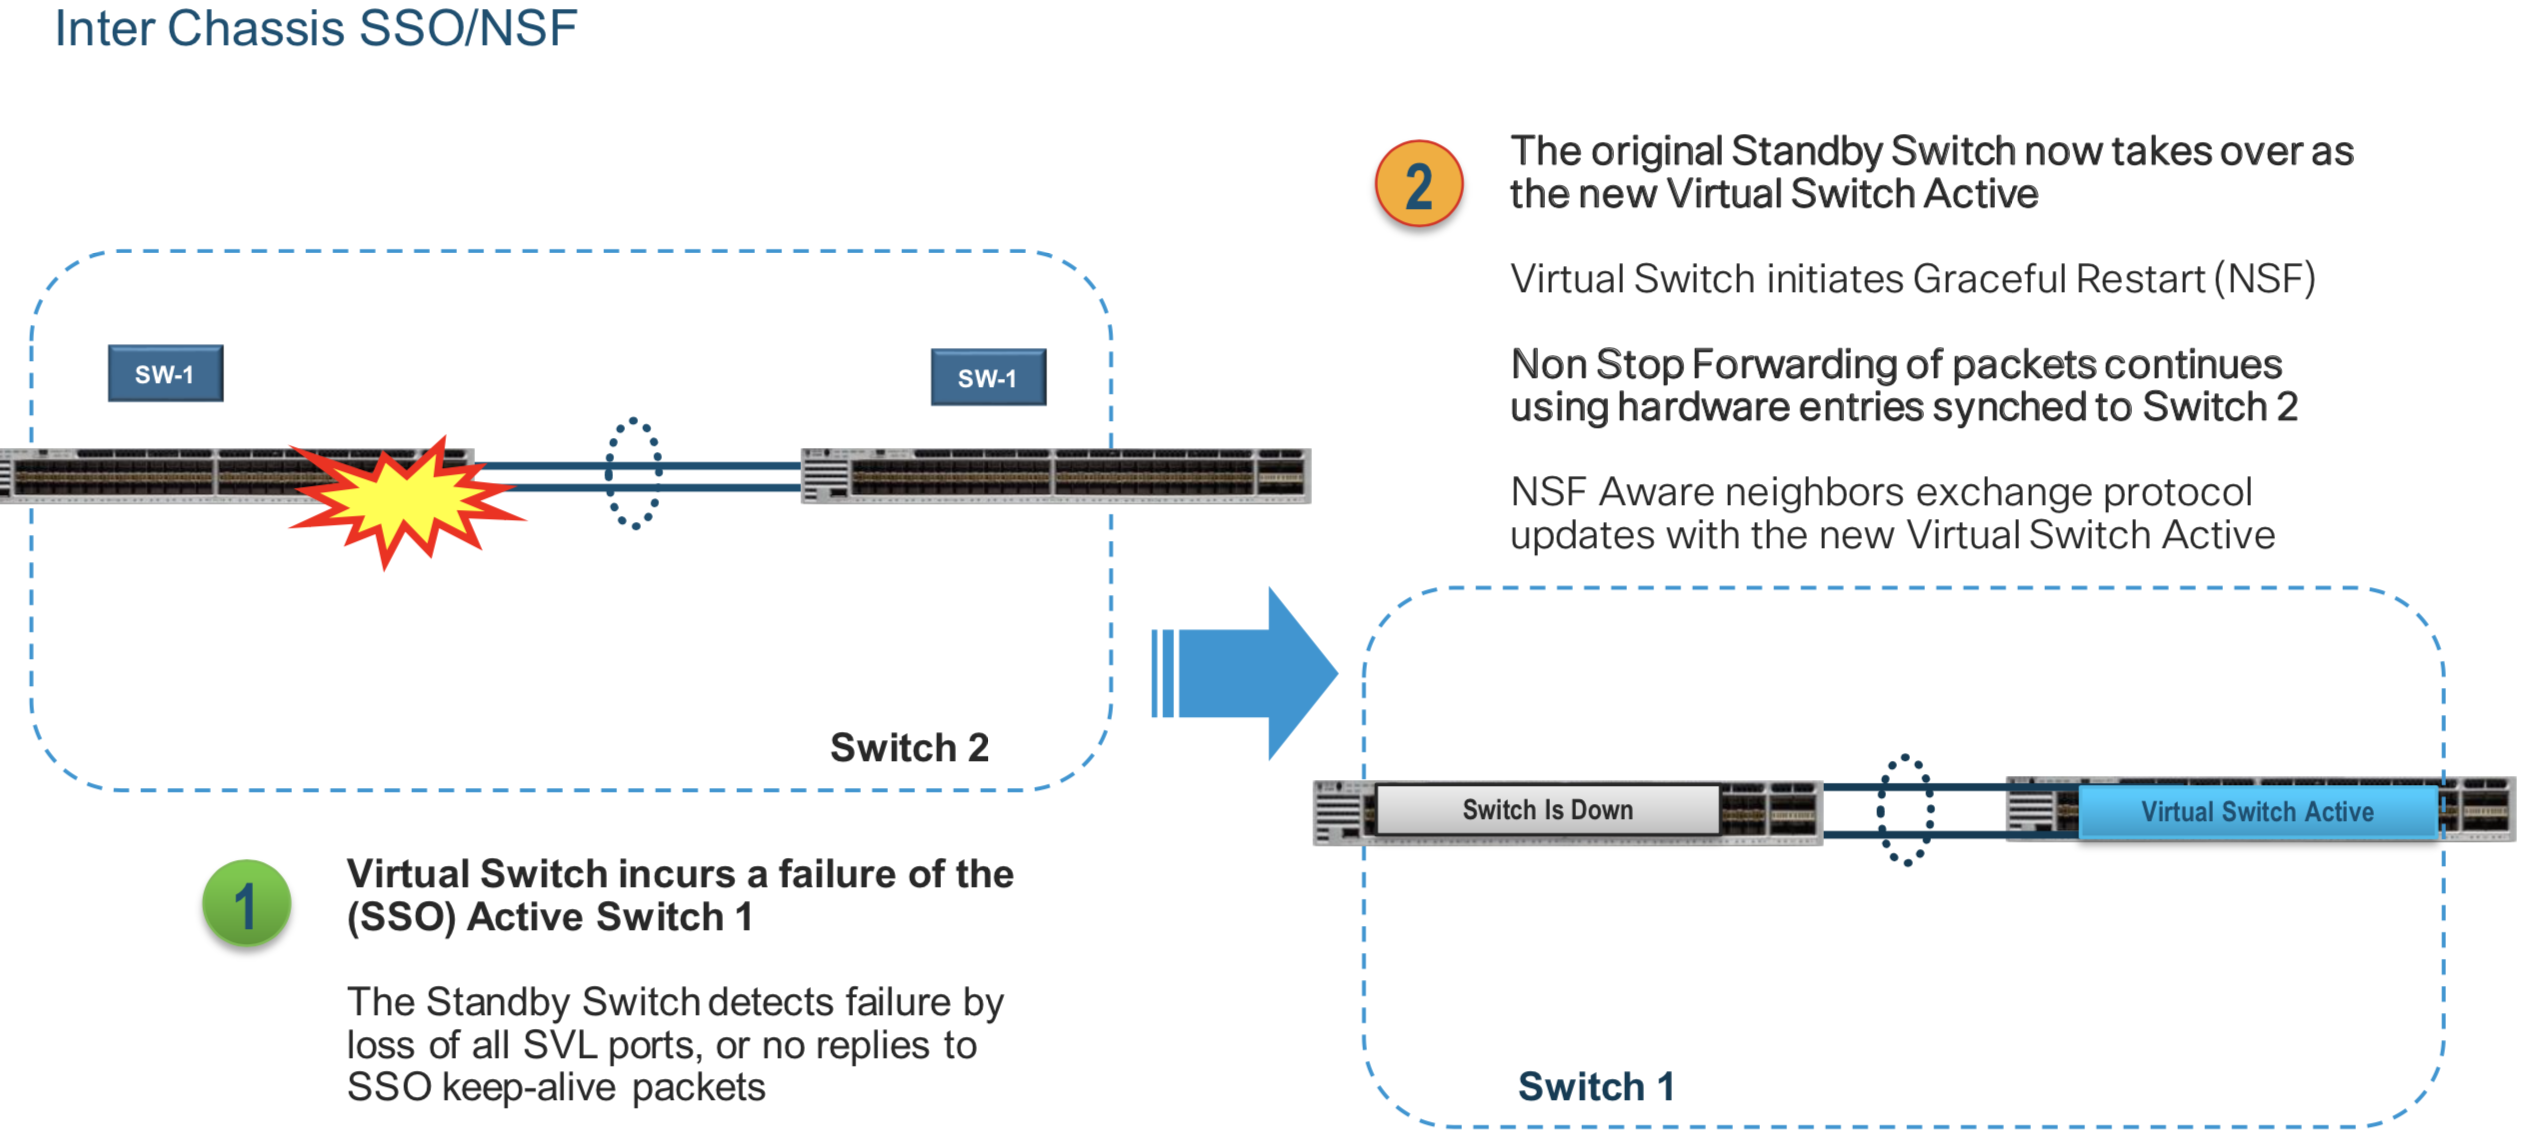
- NSF:

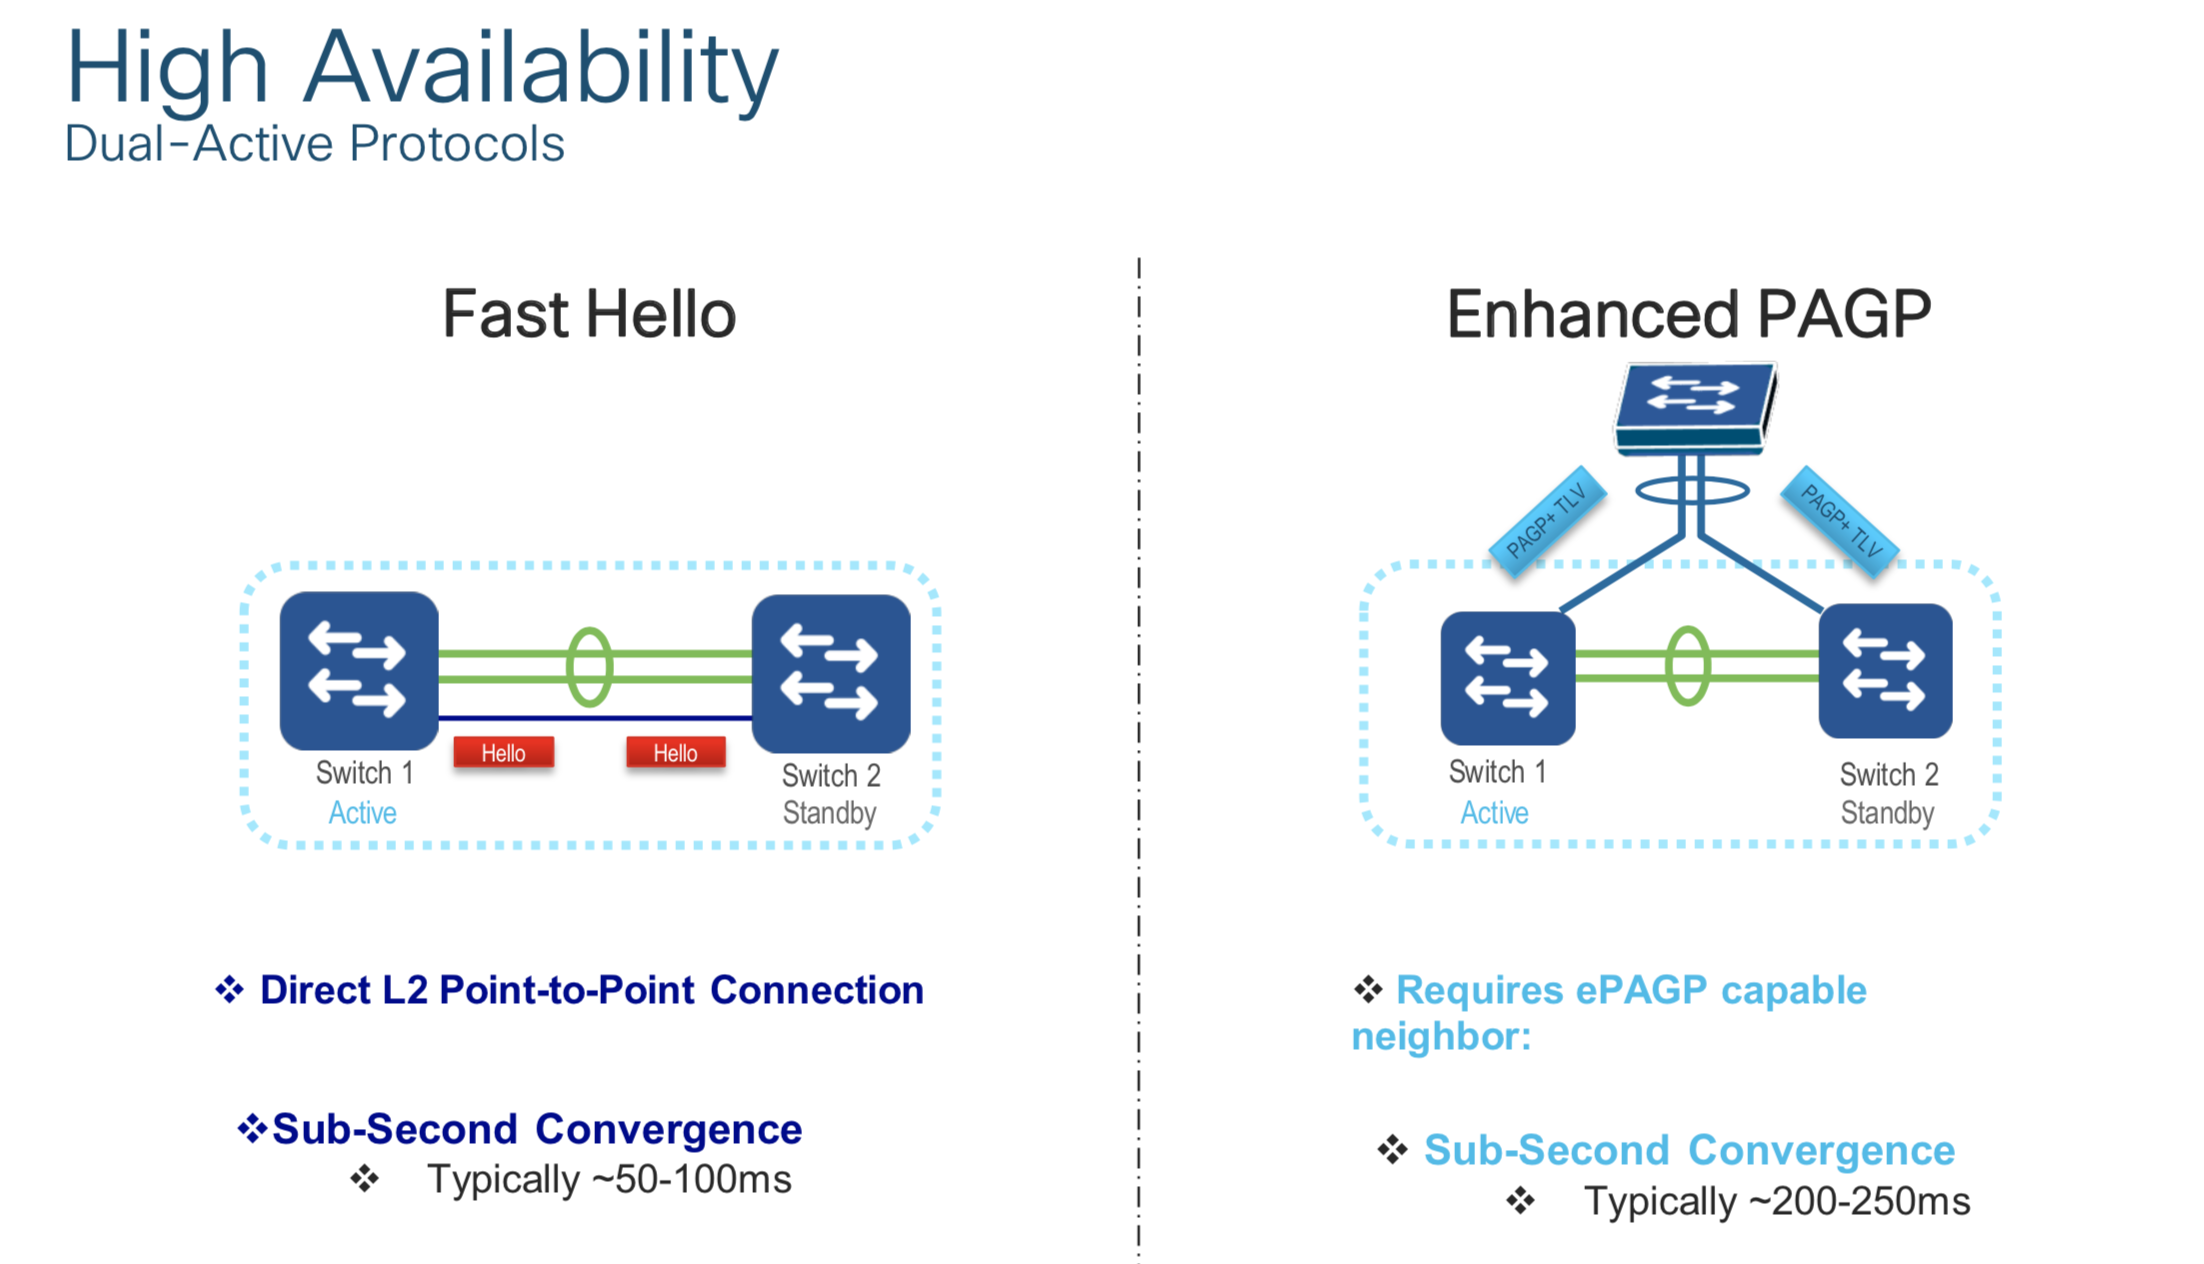
- Dual Active Detection:
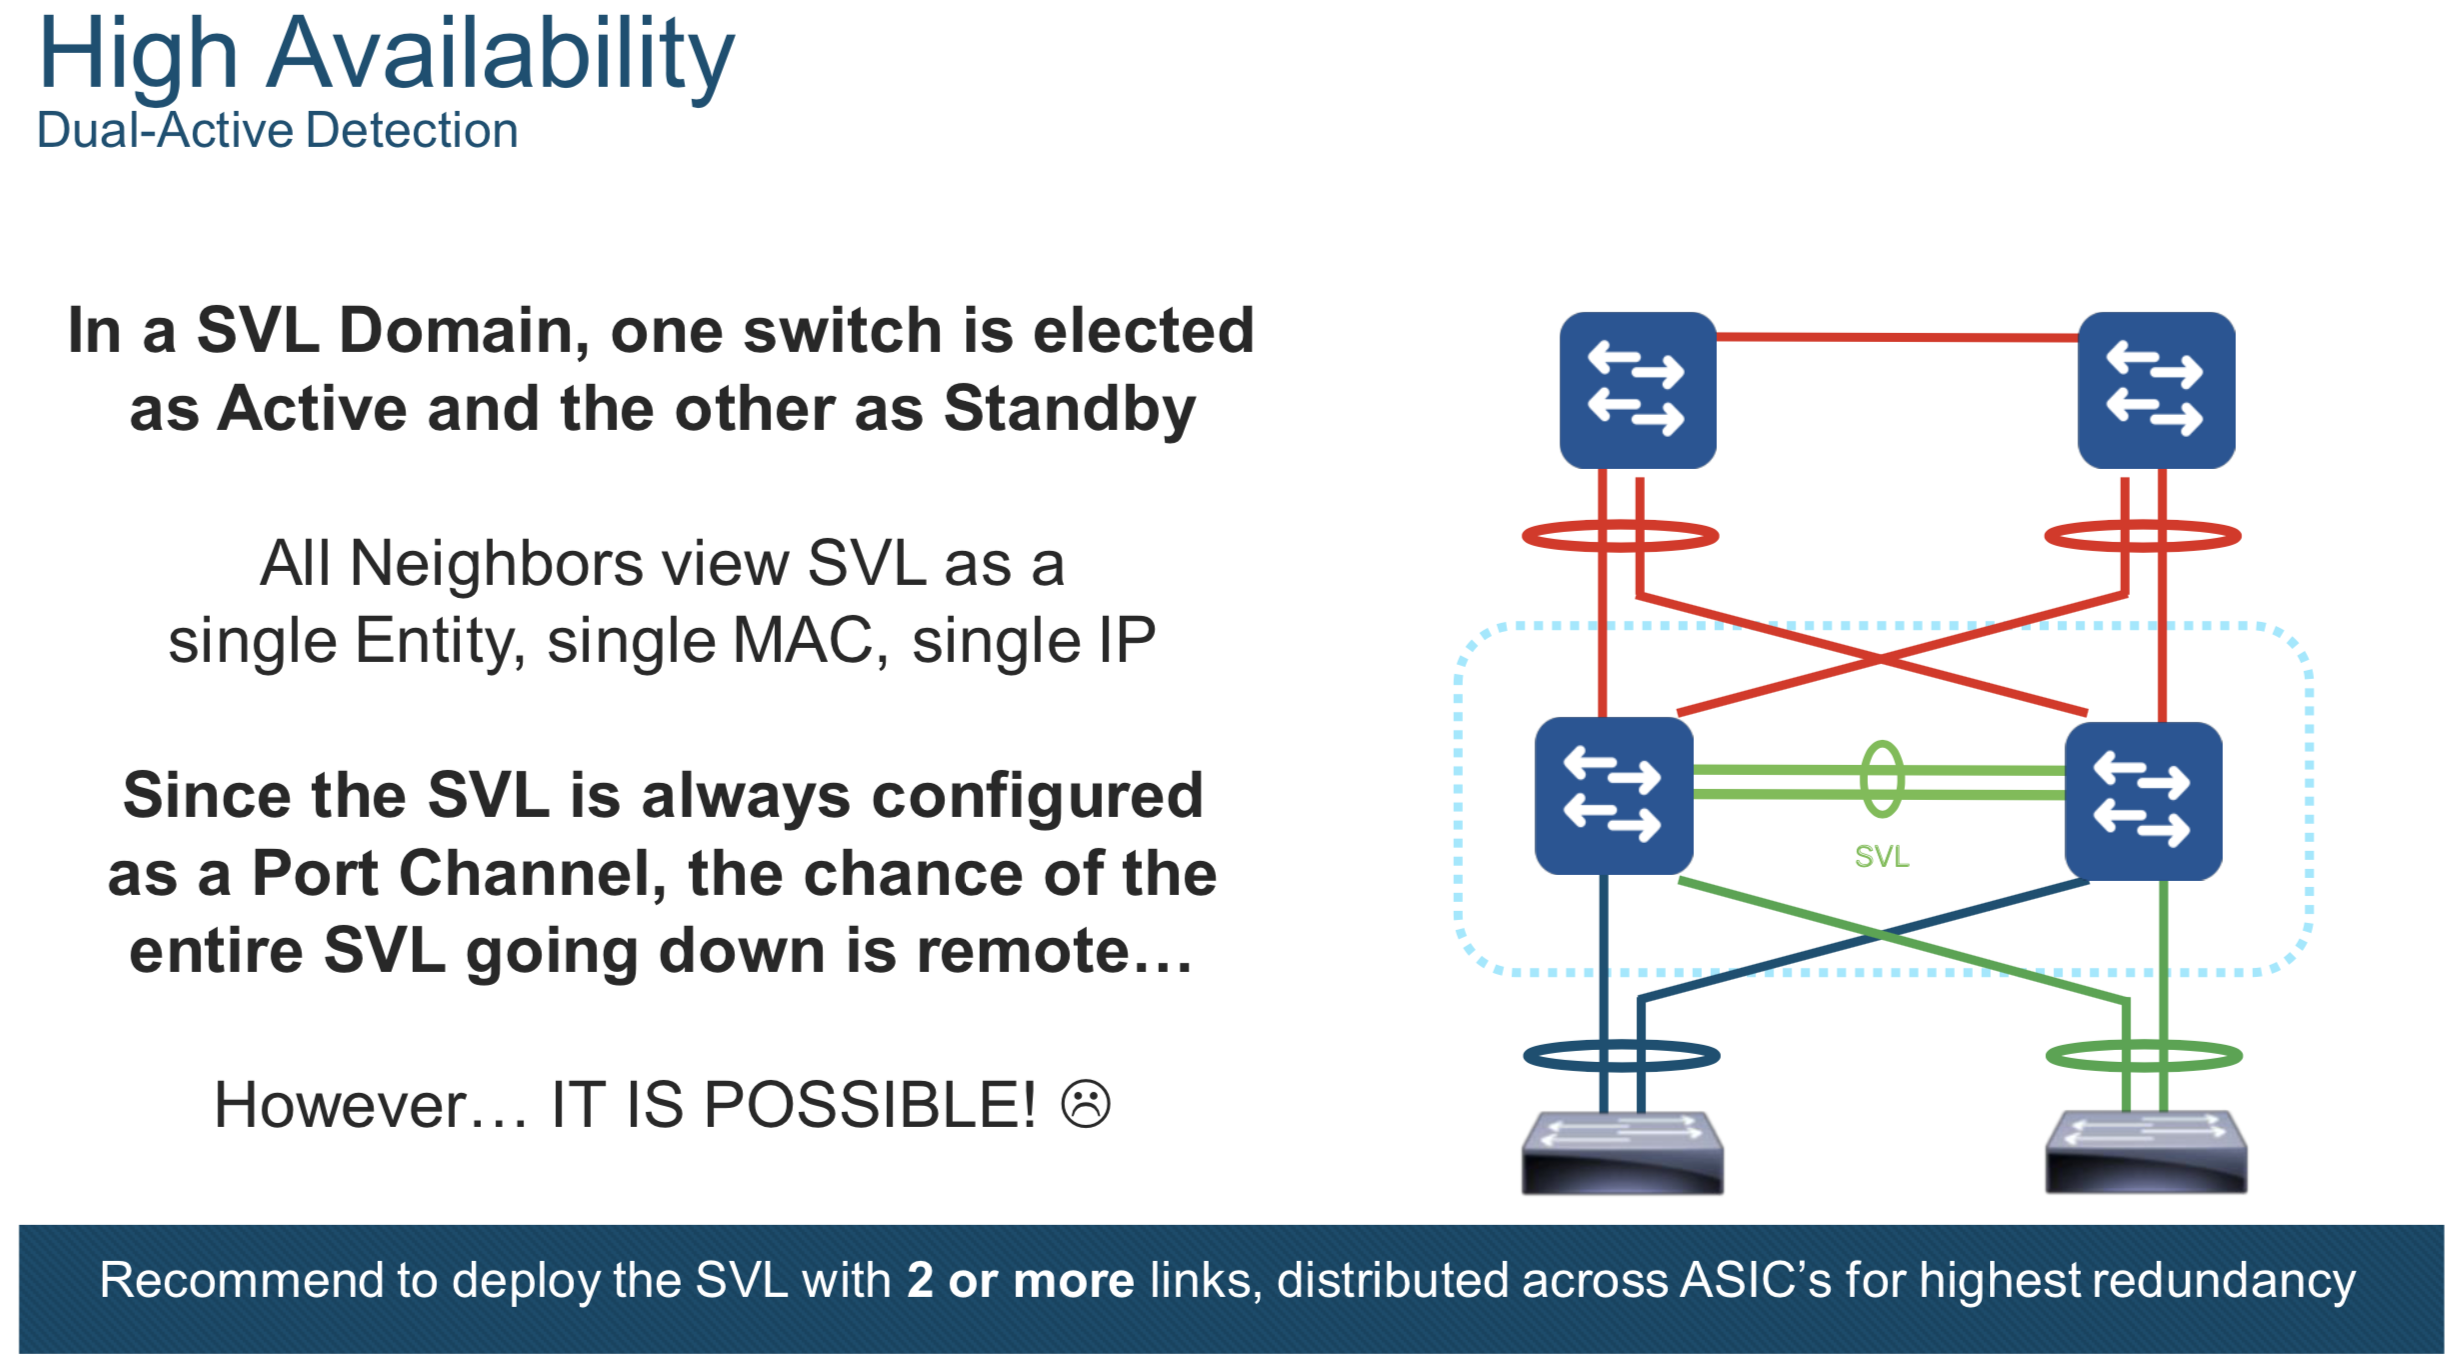
Solution for the split brain scenario? Dual-active detection link (I personally recommend “Fast Hello” method)
The next question that I usually get is around hitless (ISSU) upgrades to StackWise virtual domain because customers are used to physical StackWise where a reboot of the entire stack is required. Don’t sweat it, Cisco got you covered here as well. Allow me to introduce you to Two-Node StackWise Virtual ISSU.
StackWise Virtual Configuration:
Don’t blink or you might miss this ultra complex configuration. <grin>
Note: I typically, don’t plug in the physical StackWise virtual cables until the entire config is completed and each switch is reloaded.
SW_1:
- #Configure terminal
- (config)# stackwise-virtual *required*
- (config)# domain 1 *required*
- (config)# interface range TenGigabitEthernet1/0/1 – 2 *two interfaces recommended, must be 10/25/40/100Gbps*
- (config)# stackwise-virtual link 1 *required*
- (config)# interface TenGigabitEthernet1/0/48
- (config)# stackwise-virtual dual-active-detection *recommended*
SW_2:
- #Configure terminal
- (config)# stackwise-virtual *required*
- (config)# domain 1 *required*
- (config)# interface range TenGigabitEthernet1/0/1 – 2 *two interfaces recommended, must be 10/25/40/100Gbps*
- (config)# stackwise-virtual link 1 *required*
- (config)# interface TenGigabitEthernet1/0/48
- (config)# stackwise-virtual dual-active-detection *recommended*
Cable up the StackWise virtual links and dual-active-detection link, wr mem, reload and watch the join magic via the console. That’s it!
Here’s the config guide for reference and more details.
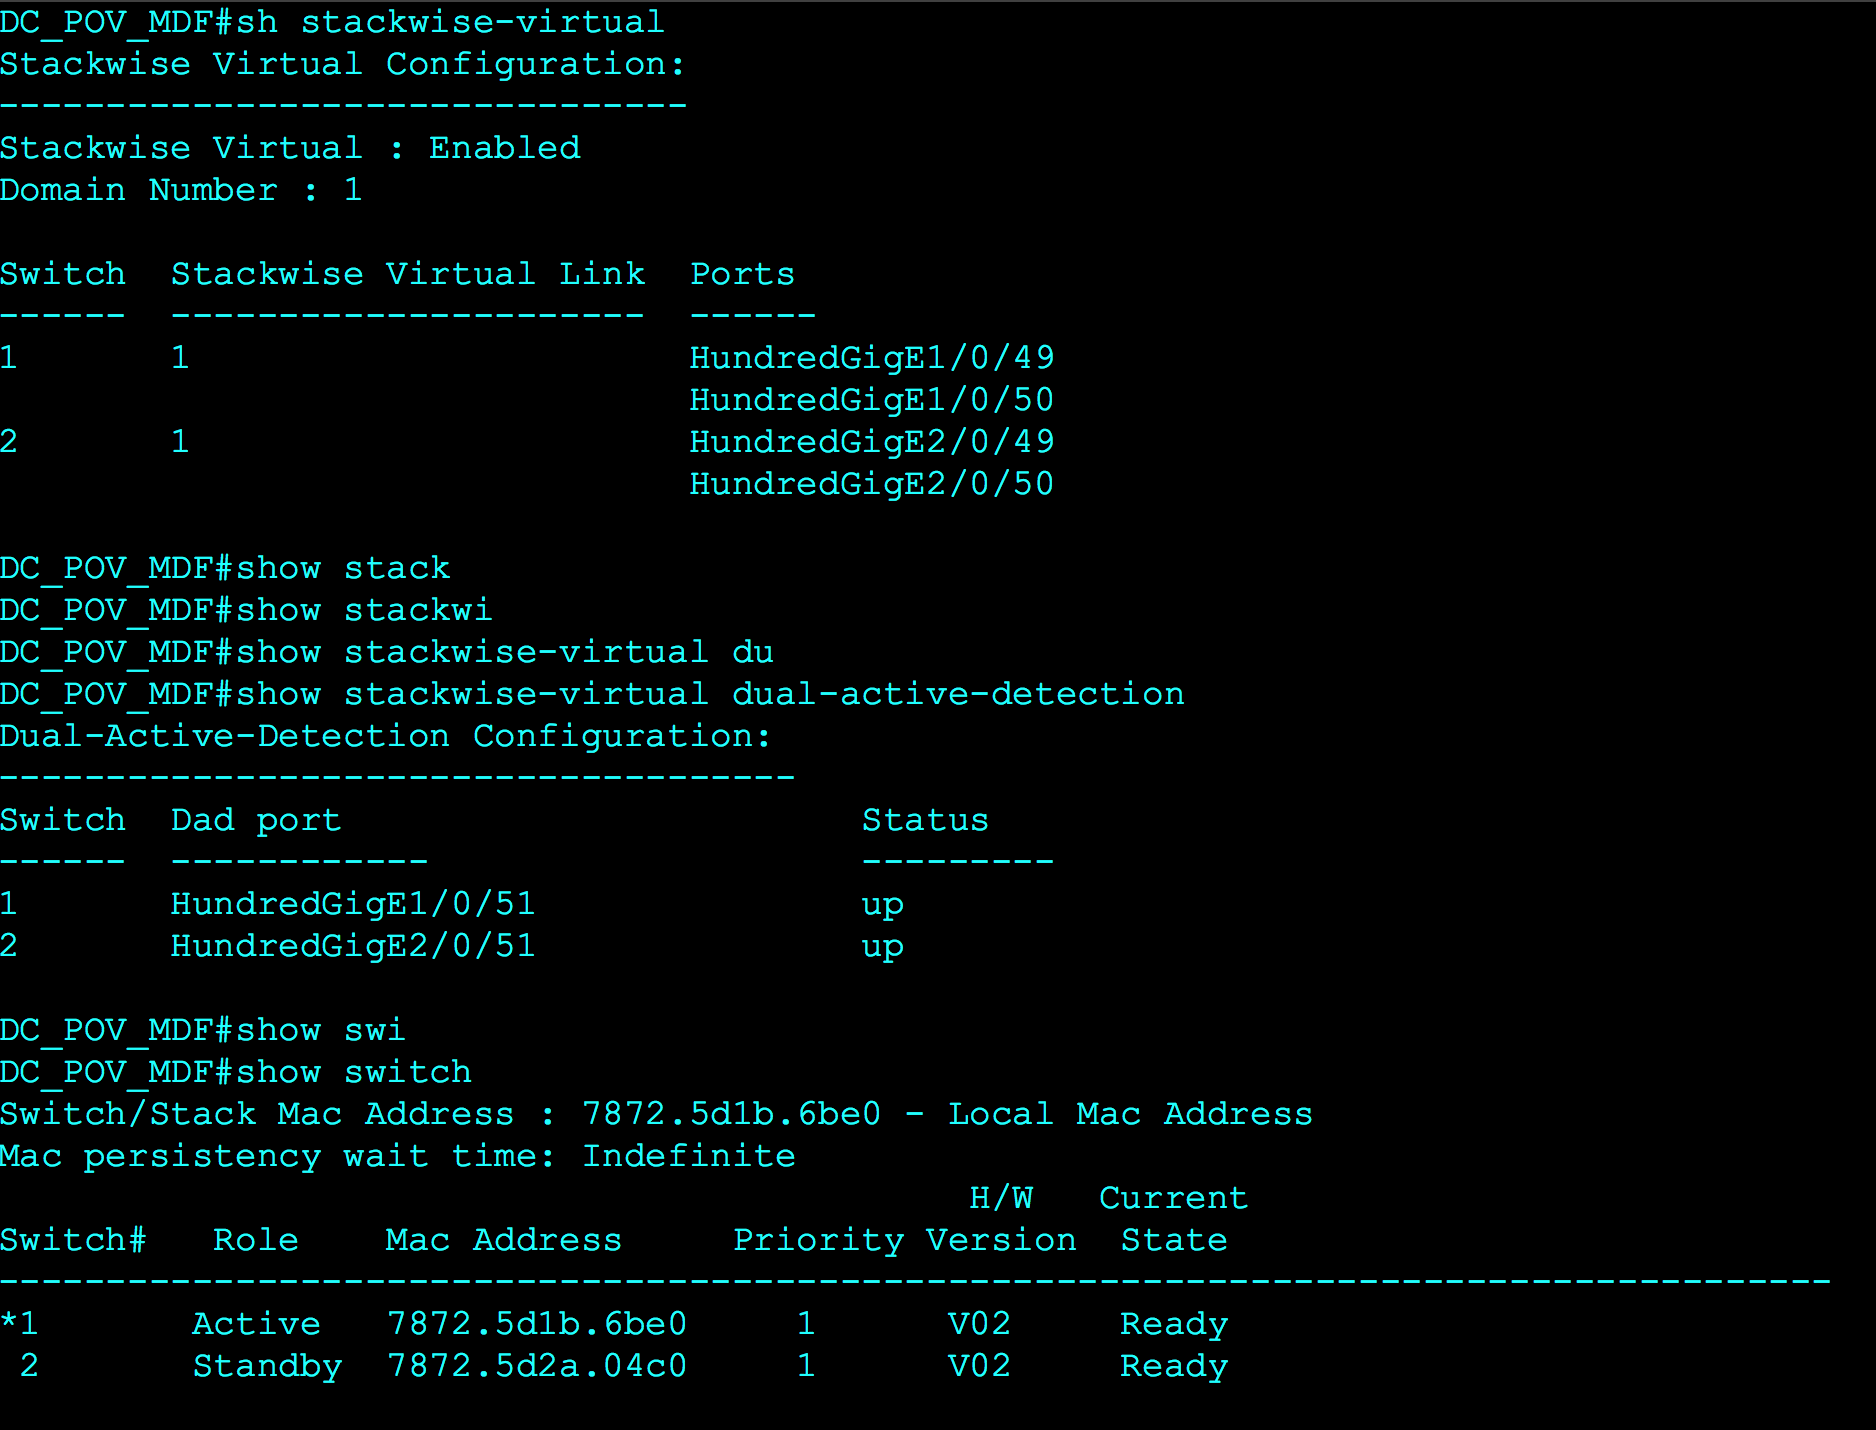
Now, let’s verify the config with the following commands.
- “show stackwise-virtual”
- “show stackwise-virtual dual-active-detection”
- “show switch”

That’s All Folks!
This blog post has gone a little longer than I wanted, but I hope you find the information useful. There’s so many cool high availability features that I didn’t get to discuss (SMU, FSU, GIR) so, stay tuned for the next blog post “Catalyst 9k HA”.
shaun
One Last Thing…
In the spirit of learning from our mistakes and sharing knowledge. Never EVER preform a “factory reset” on a Cat9k that’s running StackWise virtual to disable SV.
By “factory reset” I’m not talking about changing the config-register from 0x102/0x2102 to 0x142/0x2142 or “SWITCH_IGNORE_STARTUP_CFG=1” in ROMMON to recover the local password. I’m taking the actual factory reset CLI command “factory-reset all”.
You see, in IOS-XE 16.9 we started to enforce licensing (DNA essentials/DNA Advantage) on the Cat9k platform. If you preform the above factory reset command it will ERASE YOUR LICENSING. No licensing = no StackWise virtual command syntax and will make for a very bad day…
Instead, simply follow the config guide to dissolve the StackWise virtual stack the correct way and learn from my personal mistake. <grin>